Tuesday, July 31, 2012

Small Cakes: Babas I

I am very excited to be past the Basics chapter and on to actual baking.  Even better, I am starting with a type of small cake called a Baba.  Baba was the nickname of my grandmother, and she was just awesome.  Hopefully, this would make her proud.

Today I was on another dead-end wild goose chase that absorbed far too much time (to be covered in the next entry), so I only accomplished the first two out of the five baba recipes.  The first was the Quick Baba on page 52.


Babas are usually yeast-risen cakes, but this one relied on baking powder instead.  These cakes also have their own mold, the baba mold.  I picked up mine at Sur la Table, and they offer a variety of molds.  The molds run between 2 and 3.5 inches in height, and also have a variety of diameters.  I went with molds that were 2.5 inches tall and about that same measurement across.


The molds need to be buttered on the inside for easy release later.


The liquids are whisked together in a mixing bowl to begin the recipe.


The dry ingredients follow, after being sifted.


Mix together, and you are ready to fill the molds.


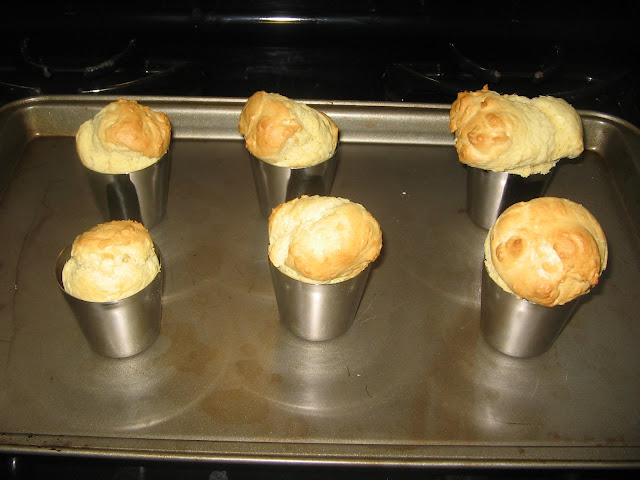
Which brought me to my first problem...I knew these things were going to rise, I just didn't know how much.  As this was my first baba recipe,  I used this opportunity to fill the molds to different heights to experiment.


As you can see, filling them to different heights yielded quite different results.


Some results were ridiculous.


It was time to introduce the Syrup for Babas that I created in the previous post.  At this point, I had a little bit of foresight, and moved the babas to another cookie sheet that I had lined with aluminum foil.  I anticipated the syrup running all over the place, so I wanted to use the foil for easy cleaning.


Here is one of the correctly-sized babas.  The goal is the drizzle the syrup over the top so that it falls in that small gap around the edges and the baba soaks up the syrup all over.  


 Here is my first final baked product!


This tasted like a biscuit.  Reflecting on the recipe, it is very close to a biscuit, especially since it lacks any kind of sweetener and the batter is very thick.

I enjoyed having some sort of reference scale as a note in my book, so in that spirit here is the scale that I will tentatively use, and probably modify as I go along (final result will be in bold):

What the heck was that?
Meh.
Interesting, glad I tried it, but won't go back to try this again.
Good, but not repeat-worthy.
Very good, with some modifications this could be seen again.
This is company-worthy.

The second recipe today was the Rum Baba from Lorraine on page 53.


This time I got a little smarter...I lined the baking sheet with aluminum foil right away so that I only had to clean one sheet.  The molds were buttered and I was ready to start mixing the batter.


Order was backwards for this recipe, with the dry ingredients being mixed together first.


The dry ingredients are sifted into a mixing bowl.  The next step was to make a "well" in the dry ingredients to hold the wet stuff.  I generally grow impatient with this technique, so I learned to use the mixing bowl for my stand mixer.


The wets were added in and I dug out the dough hook for my stand mixer.


Thanks to the first recipe's experiment, this time I knew how much batter to place into the molds.  I also used the back of a spoon to smooth out the tops to enhance the final appearance.


Perfect!


I got out the rum syrup, and then had a thought....


The margin of error is small, and in the previous recipe I had some difficulty in controlling the syrup out of my container.  Frankly, it ran out too quickly and poured out all over the place.


To remedy this situation, I switched to a smaller container with a much smaller opening.  This gave me significantly superior control.


I liked the way these turned out!


This recipe is SO much better than the first one.  Texture was smoother, the interior was fluffier and much less dense, and flavor was yummier.  Also, the addition of sugar helped to make this taste much more like a cake.

What the heck was that?
Meh.
Interesting, glad I tried it, but won't go back to try this again.
Good, but not repeat-worthy.
Very good, with some modifications this could be seen again.
This is company-worthy.

Monday, July 30, 2012

The Last of the Basics: Sauces & Syrups

I am SO excited to finally get into some baking, which is right around the corner.  I took last night and today to knock out all of the sauces and syrups, which is the last section of the Basics chapter before I get to the real stuff.  I had to cruise through ten recipes, so I'll get right to it, starting with the Rum Sauce on page 46.


There is nothing spectacular about this one...mix rum, water, and sugar, then slowly bring to a boil over low heat.  That's it.


I decided that I needed some sort of rating scale for these recipes, and started to make notes in my book.  I decided to keep track of each recipe's thickness, tastiness, and versatility (how easily modified the recipe could be).  For the Rum Sauce, I graded it as (all on a scale from 1-10, 1 being low, 10 being highest/best):

Thickness: 2
Tastiness: 6
Versatility: 9 (this technique could be done with just about and liquor) 

Next up was a series of sauces called sabayons, starting with the Sabayon on page 46.


Whisk the egg yolks, sugar, vanilla, and lemon zest in a large heatproof bowl.


When it turns pale and thick you are ready to add the fortified wine of your choice.


I selected Madeira as my fortified wine because it was also used in a later recipe, and I wanted to compare techniques.  For the next two pictures, I wanted to compare the change in volume between "before" and "after" going on the double boiler.  Here is the before (look at where the whisk wires are and how much is covered):


Here is the after:


That's all there is to this one!  The final product is a bit vinous, which is understandable considering the ingredients.


Thickness:5
Tastiness:7
Versatility: 8

Third up today was the Milk Sabayon on page 47, which is essentially a kid-friendly version of the previous recipe.


The egg yolks, sugar, and salt are whisked on the double boiler, instead of being whisked before being introduced to heat.


Then the vanilla and milk are added in, thickened, and then you are done.  Overall, it has a decent consistency, but not a whole lot of adult flavor.


Thickness:6
Tastiness:5
Versatility: 2

Moving on, I tackled the Sabayon Sauce With Madeira on page 47. 


Egg yolk and sugar are whisked in a double-boiler (surprise) and then Madeira is added once the egg mixture is thickened and increased in volume.  I set up my mise en place to make sure I didn't overcook anything.


Pretty simple stuff.  This recipe had much more an alcohol burn to it than the previous Madeira one, so I docked it a few points for that.
 

Thickness:5
Tastiness:4
Versatility: 8

 The half-way mark was the Red Currant Sauce on page 47.  I didn't want to buy red currant jelly just for the sake of this recipe, so I substituted it with raspberry jelly.  If anything, I was learning a technique and would be testing its versatility.


Amazingly simple, incredibly quick, and surprisingly tasty...this was a winner.  You could use just about any jelly you wanted to serve a multitude of uses.  This recipe got a star next to it.


Thickness:4
Tastiness:7
Versatility: 10

Now it was on to something a little more technically difficult, the Apricot and Kirsch Sauce on page 48.


The recipe calls for five apricot halves, so had some basic prep work to do.


These went into a saucepan with the sugar and a bit a water to help cook them in a syrup.


Towards the end of the cooking time, the skins of the apricots were easily removed.


The syrup and apricots were introduced to Mr. Immersion Blender to help bring them together and become friends.


The rice flour and kirsch were added in after that.


Everything was whisked over a gentle heat until the starches in the rice flour expanded to thicken the sauce.


You now have a very flavorful and fruity sauce with moderately high thickness.   I liked the flavor of this quite a bit, and could easily see the same technique used with a variety of fruits.  This also got a star next to it.


Thickness:8
Tastiness:8
Versatility: 7 

It was time for the sabayon technique to be used again, as well as repeating the use of apricots with the Apricot Sauce on page 48.


The apricot halves are cooked in a bit of water, but this time there was no sugar added at this point.


The egg yolks and sugar are whisked together before being placed on a double boiler.


This time I blended the apricots out of the saucepan because I needed that saucepan for the bottom half of the double boiler.


Look familiar?


When the egg mixture has thickened, it is time to add the apricot puree.


That's about it...overall my feelings are mixed when trying to decide which fruit sauce was better.  This sauce was thinner and more difficult to achieve, but the taste was through the roof.


Thickness:5
Tastiness:9
Versatility: 7 

Bearing down the homestretch was the Syrup for Babas on page 48.  I was excited about this tastefully-named (more on that in the next entry) recipe because it was something I was actually going to be using in the very near future.


The recipe asked for "pared zest" from a lemon.  I wasn't too sure what that was, so I had to Google it.  It is strips of zest using a peeler instead of a grater or microplaner.


Everything gets thrown into a saucepan and brought to a boil.


As soon as it comes to a boil remove the vanilla bean and pared zest, and you are done!  This isn't terribly thick stuff, but does have an interesting flavor.  I'm curious to see how it develops over the course of a couple of days.


Thickness: 2
Tastiness:7
Versatility: 2 

Second-to-last was the Creme Anglaise on page 49, which on a side note is often used as the foundation for ice cream.


A lot of egg yolks are whisked together in a heat proof bowl.


The milk, sugar, and vanilla are brought to a boil.


Like my previous entries, these had to be tempered together.


If you go back a couple of entries, you will see my quick introduction to a bain marie.  I had to use it again.


Be VERY careful to not let this boil.  The albumen in the egg will curdle very quickly.  This sauce will thicken just ever so slightly, and then you are done.


Thickness:5
Tastiness:6
Versatility: 3 

FINALLY, it was time for my last recipe of the Basics Chapter, the Sugar Syrup on page 49.


Yup, that's it...sugar and water are boiled for one minute.


Thickness:3
Tastiness:2
Versatility: 5

Tomorrow I start a new chapter, Small Cakes!